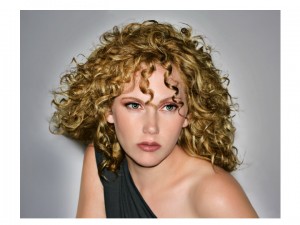
Love the fondue-inspired look from Goldwell North American Guest Artist Robert Brown in our June issue? Brown gives us step-by-step instructions on how to get it in your salon. Background:
Model Lana’s base level is the classic “dirty” blonde, 6-ish in winter, 7 in summer, but always cool and ashy in appearance regardless of level. I knew this fine-textured hair would move easily, but am always aware that these naturally mousy shades are brimming with additional gold natural contributing pigment when lifted. She had existing pre-lightened pieces throughout and very little, if any, depth anywhere in the canvas. I decided to play with shadow and hoped to utilize two different low-lights as ribboned- through toners. I needed the richer shades to visually “rob” the golden blonde of some of its light reflection. This would prevent me from having to subdue the glinty golden blonde I planned to achieve for the background foundation.
Color/Style Techniques:
- I first applied a high-lift color (scroll down for all color formulas) to the outgrowth to achieve the background foundation. My target color was a sugary brown-blonde at level 8 or just above. During the 45 minute processing time I treated the mids and ends to a color balancing with an acid shade at about a level 9 with a gold base. After processing, the hair was cleansed and re-acidified. We returned to my station and I proceeded with the hair shaping and moisture removal. Minimal length was removed but intermittent layering was worked throughout to prevent wads of curls from forming when left to dry. When dry, the bright version of gold-beige I had anticipated was revealed.
- Utilizing a slice technique, I introduced two different deposit shades into the hair. One was a true low-light and one was an enriched mid-tone to add increased structural depth to the canvas. The slices are a set of concentric arcs placed circularly about the head. I stand on one side and rotate the chair as I work through the head placing the foils. I alternate the two formulas, making sure to leave plenty of space between foils to ensure that the background foundation will represent. I also make sure to drop out any obvious blonde pieces that look beautiful and deserve saving. Once I reach the other side, I start pivoting the arcs so that I can go up and over the head. I throw in more arched slices anywhere that gets left out of the circular pattern. This shift in placement has you actually utilizing horizontal, vertical, and diagonal placement.
- After processing the deposit slices, I carefully rinse the packets, pulling them out one at a time. Otherwise the “dirty water” from the upcoming shampoo will attempt to tone down the beauty and overall finish of my shimmering mid- blonde. I cleanse the hair, re-acidify and determine if an additional overlay is necessary. All dimensional work benefits from an overlay of something that reinforces the tone as well as the shine factor overall. I chose an overlay of an ionic color that is remarkably translucent yet quite durable and shiny in a sheer golden tone.
- The overlay is applied to dry hair, so I use this opportunity to look through the new canvas and make final adjustments. It also gives me a shot at seeing the hair diffused quickly without product to help with my styling product choice upcoming. The placement and color choices were easily identified and looked on target so I proceeded with the overlay formula I had forecasted to amplify the golden graham cracker caramel combination.
- The finish was achieved by applying Goldwell StyleSign Jelly Boost bodyfying spray gel overall. I use only a wide- toothed comb to distribute the product. I had the model slide down and rest her neck on the back of the styling chair so that I could start diffusing with the hair hanging back. Once curls start to cluster and form, I stop and apply a thin veil of StyleSign Mello-Goo modelling paste to my hands so that I can twist and ribbon clusters of curls into place before they are dried completely. I resume diffusing the hair having Lana move from back to forward, from side to side. This helps prevent the hair drying in a definite part or being too flat in the crown.
- For the final polish I used two different sized ceramic wands. I am careful to not do too many pieces and to not overly smooth the ones that I do. I carefully pick up any malformed curls and cheat the curl correction around the wand. Lastly, I tousle and carefully finger another veil or two of the styling cream on any curls that need more separation. Patience and minimal handling ensure that the look stays natural and soft, supple and sexy.
Color Formulas:
Background foundation:Goldwell Topchic Highlift Series 11SV with 30 volume Topchic lotion
Color Balance for mids/ends: Goldwell Colorance acid shades 10G and 8G with Colorance processing lotion
Cleansing and re-acidification: Goldwell ColorGlow IQ backbar products
Detail slice lowlight: Goldwell Colorance Lowlights 6-7 warm with Colorance lowlights developer
Detail slice mid-tone: Goldwell Colorance Mild-Alkaline GG-mix and 7BG with Colorance intensive lotion
Tonal overlay: Goldwell ELUMEN high-performance haircolor CLEAR+ BG@8+ GK@all