Farouk Systems, Inc. artists have collaborated to introduce a new collection of colors created with the LG CHI Color Master Factory, a digital color lab able to formulate over 30,000 color combinations at the touch of a finger. The CHIC Collection — seven new looks inspired by global destinations — sparks unique ways for hairdressers to express themselves through the vitality of color. Here, hair and technology fuse together to create art, and the crown is the canvas.
“Color is such a powerful force,” said Mego Ayvazian, creative director for Farouk Systems, Inc. “It has the ability to influence mood so what better way to do that with colors inspired by beautiful destinations?”
The CHIC Collection offers a vivid array of tones perfect for various hair types. Drawing inspiration from everywhere, including the coastline of the French Riviera to the tropical rainforest of Brazil, the assortment of looks bring striking bursts of color into each hairstyle.
“The CHIC Collection was created using first to market LG CHI Color Master Factory technology to enhance creativity, collaboration, and out-of-the-box thinking,” said Patrick Kalle, global artistic director for Farouk Systems, Inc.
Explore the CHIC Collection and learn how to recreate each one by following the step-by-steps.
Created by Mego Ayvazian, Patrick Kalle, Wesley Palmer, Joshua Bernard, Sarah Harris & assistance from Lorena Garcia
Hair: Mego Ayvazian, Patrick Kalle, Wesley Palmer, Joshua Bernard, Sarah Harris & Assistance From Lorena Garcia
Makeup Artists: Jannette Marin & Ashley Reyna
Photos: Mohammed Ghanayem
Paris Sunset
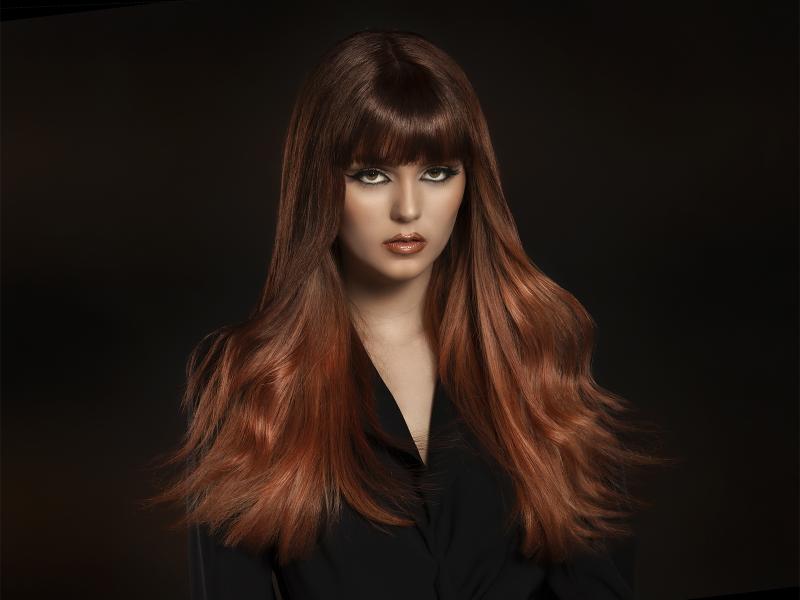
This decadently rich dark-to-light hue is true to La Ville-Lumière (‘The City of Light’); the colors blend seamlessly to create the appearance of a Parisian sunset illuminated in full glory. There is also a particular je ne sais quoi about this fiery and undulating shade that just suits every season. Plus, the color is versatile for every complexion.
Step-by-Step
Formula 1: 5cm + 5c + 10 volume CHI Color Generator equal parts for roots melt into ends
Formula 2: 7c + 20 volume CHI Color Generator + ¼ oz of orange additive
Step 1: Mist the hair with CHI Bond & Seal.
Step 2: Section the hair into 4 quadrants.
Step 3: Apply Formula 1 horizontally about two inches down from the nape.
Step 4: Starting in the nape sections, diagonal back color placement and blend down with your fingertips.
Step 5: As you work up the head, start blending the color further down to help add dimension.
Step 6: Mist the ends with CHI Bond & Seal and apply Formula 2 on the remaining hair and blend Formula 2 into Formula 1.
Haircut Step-by-Step
Step 7: Section out circle from parietal to apex and clip away to section the fringe.
Step 8: Starting in center back, take ½ inch vertical sections and slide cut into the underside length at a diagonal.
Step 9: Using a mobile guide, pull hair straight out starting at center back using vertical sections. Slide cut into mid-shaft to remove weight and create texture.
Step 10: Starting with ½ of the circle, raise the hair straight up and cut horizontally.
Step 11: Cut blunt bangs to your desired length and texturize to create wispy bangs.
Step 12: Frame the face by slide cutting and blending into the bangs.
Hollywood Blonde
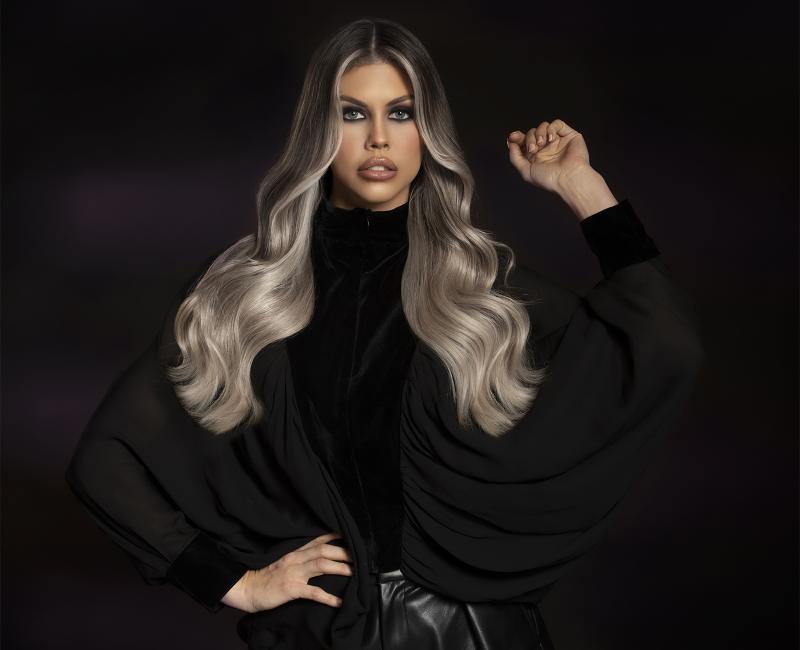
These old Hollywood inspired S-waves are a nod to California living. The look is a happy medium between two-tone hair and soft balayage highlights. The real beauty, though, lies in the ‘money piece’ highlight technique, a strategically placed pop of brightness along the hairline directly framing the face. It helps soften and lift the complexion for a sun-kissed glow with minimal effort and maximum glamour.
Step-by-Step
Formula 1: Using a 1: 1 ½ mixing ratio CHI Bleach & Shine 30 Volume CHI Color Generator + 3 pumps of CHI Bond Rebuilder
Formula 2: 2oz 11i + 1oz 11w + 3 shots violet additive + 3oz 10 volume CHI Color Generator
Step 1: Section the crown area, leaving out fringe and rear perimeter.
Step 2: Mist each section with CHI Bond & Seal before applying CHI Bleach & Shine.
Step 3: Starting in the front quadrants, take thin slices parallel to the hairline. Apply Formula 1 with vertical brush strokes to create a blending balayage.
Step 4: Create a chunky weave in the hairline using two foils back-to-back.
Step 5: In the crown, use long backcomb from ends to root. Apply CHI Bleach & Shine by feathering with a vertical brush.
Step 6: Process up to 50 min. or until hair reaches a pale yellow.
Step 7: Apply Formula 2 to pre-lightened area and process for 20 minutes.
Step 8: Using clippers, create a blunt cut to your desired length.
Step 9: Create a “v” section in the bang area to create a guide for the long curtain bangs.
Step 10: Point cut to desired length by over directing to the opposite side. Slide cut to blend into your desired length. Point cut in the crown area to create texture.
French Riviera

This watercolor-inspired coif is reminiscent of a tropical getaway along the Mediterranean coastline with its warm and dreamy colors. The mix of tones paired with an expertly styled undercut pixie creates an edgy look that just manifests bold confidence. From the sexy side swoop to the beautiful placement of colors, this punky style is effortlessly cool, but makes a big impact.
Step-by-Step
Formula 1: 1:1 ½ CHI Bleach & Shine + 20 volume CHI Color Generator + 3 pumps of CHI Royal Treatment Bond Rebuilder (root touchup application)
Formula 2: 1oz clear additive + 1 shot of violet additive + 2 shots of red additive + 1oz 10 volume CHI Color Generator
Formula 3: 1oz 7v + 1oz Clear Additive + 2 shots red additive + 1 shot violet additive + 2oz 10 volume CHI Color Generator
Formula 4: 1oz 11i + 5 shots violet additive + 1 shot 1n + 1oz 10 volume CHI Color Generator
Formula 5: Custom mixture of CHI Chroma Paint Blue Crush + CHI Chroma Paint Green with Envy + CHI Chroma Paint Pearl Glam
Step 1: Mist the hair with CHI Bond & Seal
Step 2: Apply Formula 1 to new growth and process to your desired level.
Step 3: Rinse and shampoo with CHI Royal Treatment Bond & Repair Shampoo.
Step 4: Rough dry hair and apply Formula 2 on entire head.
Step 5: Apply Formula 2 to the root about 1” down to create a shadow root
Step 6: Apply Formula 3 to the mid-shaft and ends
Step 7: Using your custom color mixture of CHI Chroma Paints create an accent piece in front hairline
Haircut Step-by-Step
Step 8: Take a horseshoe section. Underneath horseshoe, everything is uniform layering to your desired length.
Step 9: Start by using a 45-degree razor in the crown parallel to fingers using a mobile guideline
Step 10: Take diagonal partings to the front of ear.
Step 11: Using razor over comb technique, hold horizontal and rotate razor to blend to uniform layering underneath.
Step 12: Release the large triangle section. Over direct, using a 45-degree angle, to crown area using horizontal partings taking the guideline from crown and connect to back.
Step 13: Continue using the previous steps on the opposite side.
Step 14: Connect both side triangles in a stationary line towards middle of crown.
Step 15: Release the small triangle and point cut to create inner texture.
Step 16: Using natural fall distribution, comb hair down, position hands diagonal forward, and point cut to create form line.
Step 17: Continue opposite side.
Step 18: Comb hair up and over in front of the ear and cut a blend line along jaw line.
Step 19: Clean contour lines with tip of shears.
Rio Red
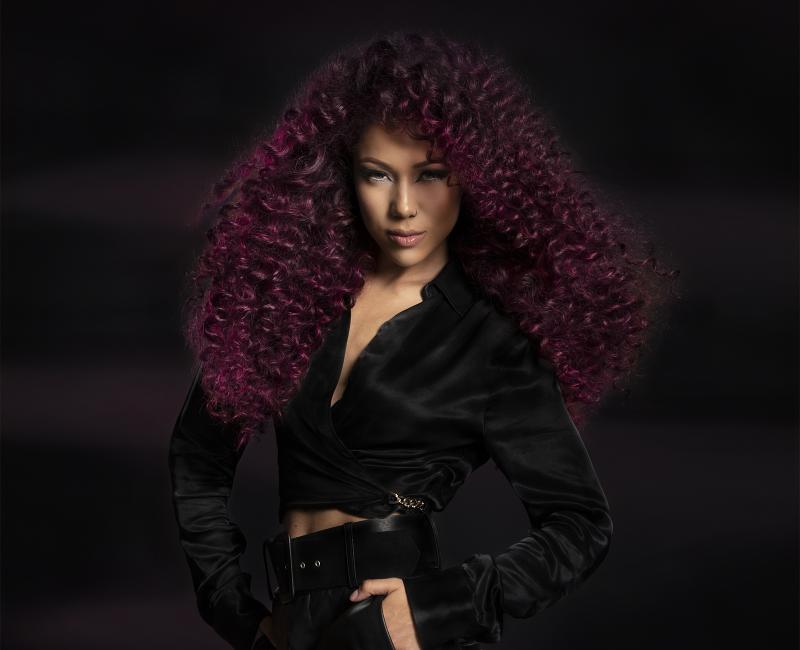
Only a dramatic burst of color could emulate the bustling Brazilian metropolis of Rio de Janeiro, and this head-turning red hue is equal parts bold as it is beautiful. Not only does it make for a super chic color statement, but it also adds warmth to complexions. Pair the hue with cascading curls or waves for even more dimension.
Step-by-Step
Formula 1: 4oz CHI Chroma Paint Red Haute + 2oz CHI Chroma Paint Oh So Fuchsia + ¼oz CHI Chroma Paint Midnight Madness
Formula 2: 4oz CHI Chroma Paint Red Haute + 2oz CHI Chroma Paint Oh So Fuchsia
Step 1: Section into 4 quadrants.
Step 2: Mist quadrants with CHI Bond & Seal.
Step 3: Apply Formula 1 to the root area.
Step 4: Apply Formula 2 to mid-shaft and ends and blend into Formula 1.
London Base
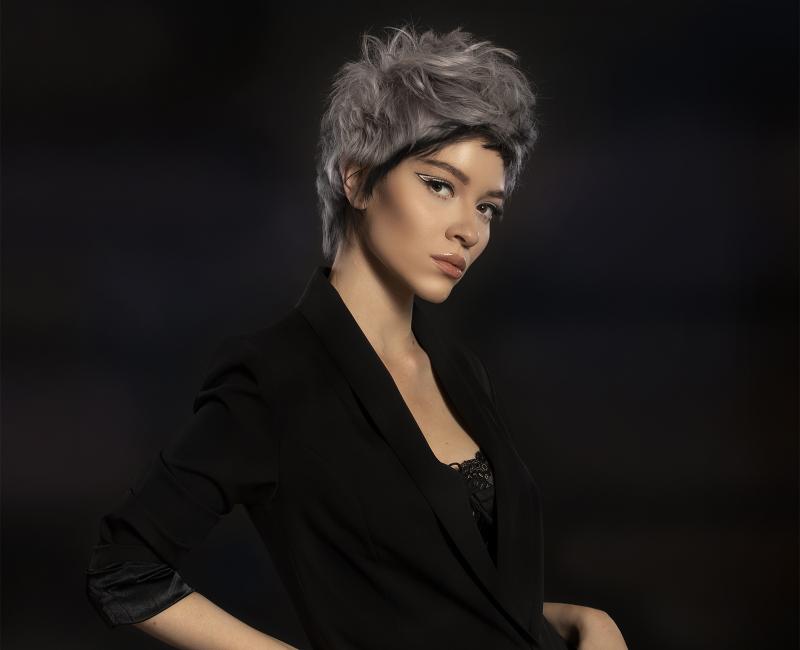
This smoky hue resembles London’s notable skyline filled with stone and steel landscape. The contrast of the gray and black tones creates an edgy look that is extremely versatile. Plus, there is no denying the power of a shaggy pixie cut; it’s a statement in and of itself because of how it frames the face and enhances the cheekbones. The tousled, wind-blown texture brings out the variations of length within the cut to make the hair appear thicker and add movement.
Step-by-Step
Formula 1: 1:1 ½ CHI Bleach & Shine 20 volume CHI Color Generator + 3 pumps of CHI Bond Rebuilder (for root touchup application)
Formula 2: 1oz 10s + 1oz 11i + 2 shots of 1n + 3.75g violet additive + 3oz 10 volume CHI Color Generator
Formula 3: 1oz 1n + 1oz 10 volume CHI Color Generator
Step 1: Apply Formula 1 to new growth and process to your desired level.
Step 2: Rinse and shampoo with CHI Royal Treatment Bond & Repair Shampoo.
Step 3: Rough dry hair and apply Formula 2 on entire head.
Step 4: Tape down the fringe ends to create a barrier, leaving 1 inch out. Apply Formula 3, creating a peek-a-boo effect to the front fringe, sideburns, and nape.
Razor Haircut Step-by-Steps
Step 5: Starting at the crown, use vertical partings and project the hair up to a 120-degree angle to create a stationary guideline.
Step 6: Comb the front hairline back to blend the side and keep sideburn length.
Step 7: Use a 120-degree angle and cut the back to the guideline.
Step 8: Using perpendicular partings, razor cut on both sides by cutting horizontally.
Step 9: Using vertical sections, blend the exterior with the interior and follow the curve of the head to blend the sides.
Step 10: Project the hair to the ceiling and point cut. Release fringe and project vertical to connect to the guideline.
Step 11: Comb the hair to a natural fall and point cut to create a soft asymmetric fringe area.
Luce Milano
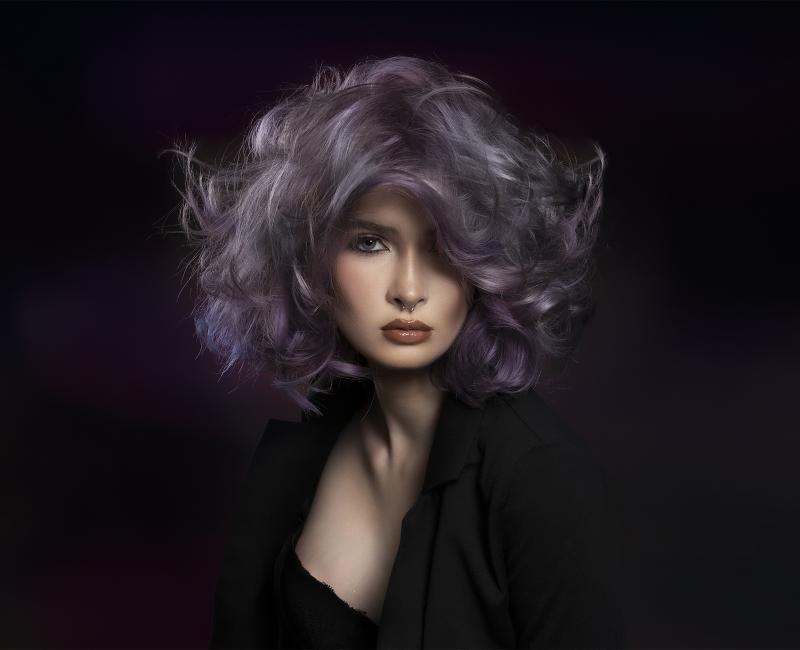
Referred to as a style powerhouse, Milan has long been recognized as Italy’s fashion capital. Therefore, it should come as no surprise that this city would serve as a muse for the beauty industry. This perfectly powdery purple paired with tousled tresses is a work of art à la Leonardo da Vinci. Thanks to the versatility of the shade, it can gracefully freshen up a complexion, accentuate eye color and can be adapted to suit various hair textures.
Step-by-Step
Formula 1: Using a 1:1 ½ mixing ratio using CHI Bleach & Shine + 20 volume CHI Color Generator + 3 pumps of CHI Bond Rebuilder (for root retouch)
Formula 2: 2oz violet additive + 1/2oz 8V + 3.75 grams of blue additive + 2 ½ oz 10 volume CHI Color Generator
Formula 3: 1oz 11I + 1oz violet additive + 2oz 10 volume CHI Color Generator
Step 1: Shampoo hair using CHI Royal Treatment Clarifying Shampoo and CHI Royal Treatment Clarifying Treatment.
Step 2: Section into 4 quadrants with a released hairline to use as guideline for length.
Step 3: Starting in the back quadrants, cut with no tension and create your desired guideline.
Step 4: After creating the guide, cut sections horizontally using a natural fall.
Step 5: Once past the occipital bone, you can walk your guide to the front.
Step 6: Turn head to the side to give you a perfect horizontal line before cutting.
Step 7: Continue until front quadrant is complete following the same sectioning on the opposite side.
Step 8: Starting at the apex, comb the hair back and point cut to create movement.
Step 9: Take a guideline from the previous section and bring to the center to cut.
Step 10: Mist hair with CHI Bond & Seal and apply Formula 1 to the new growth only. Make sure to lift the hair off the scalp to let oxygen in and to saturate the hairline to get even lift.
Step 11: Apply Formula 2 from root to ends on exterior. In the crown, only apply to the root.
Step 12: Apply Formula 3 to mid-shaft and ends and blend into Formula 2. Process for 30 min.
Vegas Rose
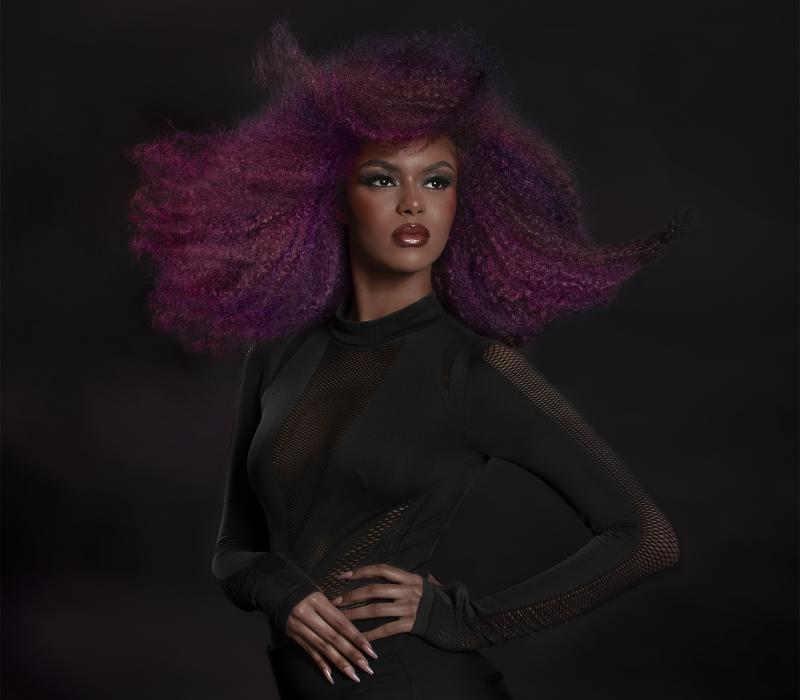
This medley of expressive and energetic colors is reflective of a true desert treasure. The pink, purple, and grey shades blend seamlessly to create a vibrant hue with beautiful dimension. This color proves especially ideal for natural brunettes who are looking to shake up their look. This hair glow up is the perfect color to keep hair looking fresh.
Step-by-Step
Formula 1: 1:1 ½ CHI Bleach & shine + 20 volume CHI Color Generator + 3 pumps of CHI Royal Treatment Bond Rebuilder
Formula 2: 1 ½ oz 6v + 4 shots of violet additive + 1 ½ oz 20 volume CHI Color Generator to root area on entire head
Formula 3: Custom mixture of CHI Chroma Paint Purple Blitz + CHI Chroma Paint Pink Lightening + a small amount of CHI Chroma Paint Midnight Madness
Formula 4: Custom mixture of CHI Chroma Paint Mango Tango + CHI Chroma Paint Pearl Glam + CHI Chroma Paint Midnight Madness + CHI Chroma Paint Pink Lightening + Oh So Fuchsia
Formula 5: Custom mixture of CHI Chroma Paint Mango Tango + CHI Chroma Paint Pearl Glam + CHI Chroma Paint Pink Lightening + CHI Chroma Paint Grey Star
Artist Tip: What you see in the bowl will be the outcome of the custom color.
Step 1: Mist the hair with CHI Royal Treatment Bond & Seal.
Step 2: Section the hair into 4 quadrants.
Step 3: Starting at the nape, take diagonal sections staying about 1 inch away from the root. Foil small slices and be sure to saturate to get even lift, leaving out the pre-lightened ends.
Step 4: After applying mid-shaft, apply to ends using the same formula.
Step 5: Process up to 50 minutes or until hair reaches a pale yellow.
Step 6: Rinse and shampoo with CHI Royal Treatment Bond & Repair Shampoo. Follow with CHI Royal Treatment Bond & Repair Conditioner.
Step 7: Rough dry and mist hair with CHI Royal Treatment Bond & Seal.
Step 8: Section the hair into small vertical triangles at the crown leaving out the bottom perimeter.
Step 9: Apply Formula 3 to the bottom perimeter.
Step 10: Using vertical slices near occipital bone to the crown, alternate Formula 4 and Formula 5 until all the hair has been completed.